Play Atari 2600 Video Games Online

Back to main list of All our 2600 Games

The Atari 2600 was first released in North America in September 1977 and featured 9 launch titles: Air-Sea BattleBasic MathBlackjackCombatIndy 500Star ShipStreet RacerSurround and Video Olympics. The final licensed Atari 2600 game released in North America was Secret Quest in 1989, and the final licensed game released in Europe was Klax and Acid Drop in 1990 and 1992. Even with their 1980s limited colors and block graphics these games are still entertaining to play today! We have over 500 Atari 2600 games for you to play online for free using our Atari 2600 Javascript Emulator.

This game is mobile device friendly and Iphone compatible. Enjoy!

Instructions and Keyboard Controls towards bottom of page.
Click “Game Reset” or F12 to Start Game

Survival Run

INSTRUCTIONS:
If you grew up in the 80’s you shouldn’t need instructions!! You might find some help at http://en.wikipedia.org/wiki/List_of_Atari_2600_games and look up the game you need assistance playing.

CONTROLS:
Click “Game Reset” or F12 to Begin/Restart Game
Arrow Keys – Move
Space bar to fire/action button


TRANSCRIBED ORIGINAL ATARI GAME MANUAL AND INSTRUCTIONS
Survival Run

Milton Bradley Company

POWER ARCADE (TM)
C O S M I C C O M M A N D E R (TM)


GAME PLAY INFORMATION

With Cosmic Commander Control you are piloting a Class 1 Starfighter deep
in a far-off solar system. You have entered a complex maze of subterranean
tunnels with no way to turn back. Follow your onboard computerized map 
through a Survival Run. Conserve and restore your energy level and score
points as you defend yourself against alien guards and their force fields.
Your Cosmic Commander Control instantly responds to every move you make to
deliver precision control and pinpoint firing accuracy. You're in total
command of all the screen action as you take off on the ultimate space
adventure.

A copyright protection is claimed on the program stored within the cartridge.

(c) 1983 by Milton Bradley Co. under Berne & Universal Copyright Conventions.
Made in U.S.A.


CONTENTS

1 controller console 1 video game cartridge
2 label sheets 4 rubber feet
1 instruction booklet 1 gunsight


HOW TO SET UP COSMIC COMMANDER

1. Connection of Video Game System: Connect your video game system to your
television following the manufacturer's instructions. Please Note: Cosmic
Commander is compatible with Atari(R) 2600(TM), Colecovision(TM) with
Expansion Module for Atari(R), and Sears Tele-Games(R) Video Arcade(TM).

2. Preparation of Cosmic Commander:

A. BATTERY INSERTION: Four "D" size batteries are required to power the
special effects (lights and vibrations) of Cosmic Commander. To insert
batteries, carefully turn Cosmic Commander upside down. Open up the
battery compartment door by gently lifting up the latch and sliding it
over the stop. Then slide the door out from under the tabs as shown in
Figure 1.

Lift off the door and insert the four batteries into the compartment
using the arrangement of the four battery symbols molded into the
bottom of the compartment as a guide. To replace the door, slide it
under the tabs until the latch snaps into place.

FIGURE 1

[SHOWING UNDERSIDE OF C.C. WITH FOUR RUBBER FEET, LATCH & LATCH STOP, 
DOOR TABS AND (INSIDE THE BATTERY COMPARTMENT) THE BATTERY GUIDES.]


B. Insert the gunsight into the two holes on top of Cosmic Commander and 
gently press into place as shown in Figure 2.

FIGURE 2

[SHOWING VIEW OF C.C. LOOKING FRONT-ON, RIGHT WAY UP. GUNSIGHT CLIPPING
ONTO THE TOP OF THE C.C. AND LOCATION OF THREE LABELS IS INDICATED.]


C. LABEL APPLICATION: peel off the three Cosmic Commander labels from the
label sheet and apply them to the unit as shown in Figure 2.

Remove the front lens as shown in Figure 3A. To do so, insert your
fingers into the grooves on both sides of the lens and gently pull
the lower tabs out of the lower slots. Then, remove the lens by sliding
the upper tabs out of the upper slots.

Attach the control panel label to the back of the lens so the dials
and headings can be read through the front of the lens. This label has
pressure sensitive adhesive along the outside edge. After the label is
in position, press along the outside edge with your finger to secure
firmly as shown in Figure 3B.

FIGURE 3A

[SHOWING C.C. WITH BASE OF LENS BEING PULLED OUT, THEN DOWN TO REMOVE]


FIGURE 3B

[SHOWING C.C. LENS (PLASTIC HOOD) WITH LABEL ATTACHED TO IT'S REAR.]


To replace the lens, slide the upper tabs into the upper slots and 
gently press the labeled lens into place until the lower tabs snap into
the lower slots.

Also, peel off the Survival Run cartridge name label from the label 
sheet and apply it to the cartridge end panel with the top of the label
toward the prelabeled side as shown in Figure 4.

FIGURE 4

[SHOWING CARTRIDGE; FACE-UP ON LEVEL SURFACE WITH END-LABEL FACING
US AND RIGHT-WAY UP.]


D. RUBBER FEET: peel off the four rubber feet from the strip and attach
them to the bottom of the unit as shown in Figure 1 on the inside
front cover.

3. Carefully plug the Cosmic Commander cable into the LEFT joystick port as
labeled on your video game system console. The cable is designed to fit
only one way so do not try to force it into the port. Match the pattern
of the holes in the plug to the pins in the receptacle.

4. Cosmic Commander Bulb Replacement:

A. If the bulb burns out, here's how to change it. Carefully unplug the
Cosmic Commander cable from the left joystick port of your video game
system console.

B. Remove the lens from the unit as shown in Figure 3A on page 3.

C. Unscrew the old bulb by turning it counterclockwise then remove it
from the socket. Replace the old bulb with a new G.E. #14, clear, 2.5
volt, screw base bulb. Screw the new bulb into the socket by turning
it clockwise.

D. To replace the lens, slide the upper tabs into the upper slots and 
gently press the lens into place until the lower tabs snap into the 
lower slots.

E. Carefully plug the Cosmic Commander cable back into the left joystick
port of your video game system console.

_________________________________________________________________________
| |
| N O W Y O U R C O S M I C C O M M A N D E R C O N T R O L |
| I S R E A D Y F O R A C T I O N. A L L |
| S Y S T E M S A R E "G O" . . . Y O U ' R E R E A D Y T O |
| M A K E Y O U R S U R V I V A L R U N ! |
|_________________________________________________________________________|


SURVIVAL RUN (TM) INSTRUCTIONS

Powerful aliens have assembled an awesome strike force to destroy Earth. Grab
the controls of your starfighter and attack the enemy fortress, lying deep
inside a distant planet. Fly through the maze of subterranean caverns at hyp-
erspeed, following your onboard computer map for navigation. Fire your photon 
torpedoes to zap enemy force fields and marauding alien guards as you race 
toward the ultimate showdown against the Alien Master in his command ship.


OBJECT OF THE GAME

Maneuver through the maze of tunnels, shooting alien guards, force fields,
and the alien command ship to score the most points.


HOW TO SET UP THE GAME

1. Cartridge Insertion: make sure the Power Switch on your video game system
is OFF. Hold the cartridge so the large Survival Run label on the top 
panel is towards you and reads right side up, then carefully insert the 
cartridge into the cartridge slot. Make sure the cartridge is fully
inserted in the slot, but do not try to force it. Please Note: when rem-
oving the cartridge, turn the Power Switch OFF, then carefully pull the
cartridge straight out of the slot.

2. Turn your TV on and slide the Power Switch ON. You'll hear a short series
of musical notes. Adjust the volume control on your television set to the
desired level. Also, the entrance to the first tunnel appears on your TV 
screen.

3. Skill Levels: there are five different skill levels,numbered 1 through 5.
When you slide the Power Switch on, the game is on skill level 1. This
number is displayed at the top of the screen. Skill level 1 is the easiest
because your starfighter is flying the slowest. Skill level 5 is the hard-
est because your starfighter is flying the fastest. To change the skill 
level, depress the Game Select Switch. Each time you depress it, the skill
level increases by 1 until it reaches 5, then it returns to 1. 
Please Note: the skill level cannot be changed during the game.

_________________________________________________________________________
| |
| N O W Y O U B L A S T O F F T O A D V E N T U R E ! |
|_________________________________________________________________________|


HOW TO PLAY THE GAME

1. Starting the Game: press the fire button on your Control to start the 
game.

2. Your Energy Level: at the start of the game, the energy cells of your 
Starfighter are fully charged. Your energy level is displayed on the
screen by the black dot on the green energy bar above your score. As you
lose energy the dot moves across the bar to the left. If your energy falls
to 50%, the bar will turn yellow to caution you. If your energy level 
falls to 25%, the bar will turn red to warn you. You lose energy when your
Starfighter is hit by a force field or shot by an alien guard or the alien
command ship. Also you lose energy each time you shoot your laser cannon
or your gunsight touches a side wall in a tunnel. You gain energy each
time you successfully complete a tunnel in a maze. If you successfully
navigate the entire maze and destroy the alien command ship, your energy
cells will be fully recharged.

3. The Computer Map: the computer map at the top of the screen shows the
interconnecting maze of underground tunnels within the alien planet.
Refer to Figure 5 to see an example of a computer map. The blinking white
dot is your position in the maze. You must travel from the left side of
the maze to the right side. As you fly your starfighter through the 
tunnels, the dot moves to show your changing position in the maze. There
is only one safe route through the maze so be very careful.

FIGURE 5 
_________________________________________
The blinking dot | _________ _________ _________ | Dead End
shows your position | |_ ___ | |_ ___ | |_ ___ |<---|---- Tunnel
in the maze --------|--->|o| |_| | | | | | | |_| |
|____| | _______| | _| |___| | ________|
Start Here --------> ____ | |_ ___ | |_______ | |_ ____ <--- Finish
| | | | | | | _ | | | | | Here
| _| |___| | _| |___| | _| |___| | |
| |_________| |_________| |_________| |
|_________________________________________|


When you approach the intersection at the end of each tunnel as shown in
Figure 6, you must decide whether to take the tunnel to the right or the
tunnel to the left. If you hit the divider between the two tunnels or if
you make the wrong choice and fly into a dead end tunnel, you will crash.
Use this computerized map as your guide as you navigate through the maze.
Check it before you reach an intersection so you'll know which way to 
turn.

FIGURE 6

[SCREEN SHOT LOOKING DOWN TUNNEL. A VERTICAL "DIVIDER" IS AT THE CENTER OF 
THE TUNNEL. "LEFT TURN" TO LEFT OF DIVIDER, "RIGHT TURN" TO RIGHT OF 
DIVIDER, "GUNSIGHT" VISIBLE AS A CROSS-HAIR. YOUR "COMPUTER MAP" IS TOP-
CENTER, "SCORE" IS BOTTOM-CENTER AND THE "ENERGY BAR" IS JUST ABOVE THE 
SCORE.]


4. Flying Your Starfighter: the screen shows your view of the tunnels from
the cockpit of your starfighter. You can sense your tremendous speed from
the way the walls, ceiling and floor of the tunnel rush toward you. Your
starfighter always flies through the center of a tunnel. The cross-shaped
gunsight on the screen shows the direction in which your laser cannon is 
aimed. To move the sight to the left, turn your Control to the left. To
move the sight to the right, turn your Control to the right. Pull your
Control back to move the sight toward the floor of the tunnel. Push your
Control forward to move the sight toward the ceiling of the tunnel. When
you approach the intersection at the end of each tunnel, aim the sight in
the direction that you want to fly. For example, if you check your comp-
uter map and see that you must make a right turn at the next intersection,
aim the sight toward the entrance to the tunnel on the right side of the
divider when you approach the intersection.

5. Shooting Alien Guards: your fire button is on top of the left handgrip of
your Control. Press it to shoot photon torpedoes from your laser cannon.
You can shoot single shot or rapid-fire. Each shot drains energy from 
your energy cells. Use the cross-shaped gunsight on the screen to aim
your laser cannon. Alien guards appear at the far end of the tunnel and
move toward you. Maneuver your gunsight so the alien guard is in the 
center of the sight, then fire. You'll see a photon torpedo shoot directly
ahead of you into the center of the cross shape as shown in Figure 7.
When you shoot an alien guard, he is instantly vaporized. Alien guards
have short-range laser guns so be careful. If you let them get too close,
they'll shoot at you. Each shot that hits the deflector shields of your
starfighter drains energy from your energy cells.

FIGURE 7

[SCREEN SHOT LOOKING DOWN TUNNEL. AN "ALIEN GUARD" IS NEAR THE RIGHT-HAND
WALL. (LOOKS LIKE A FLYING SAUCER WITH EYES). YOUR "GUNSIGHT" IS BELOW 
THE GUARD AND A "PHOTON TORPEDO" IS SEEN HEADING STRAIGHT UP FROM THE 
BOTTOM OF THE SCREEN TOWARD THE GUNSIGHT.]


6. Shooting Alien Force Fields: alien force fields appear at the far end of 
the tunnel and move toward you, emitting a loud sound. The only way to
destroy a force field is to shoot its source which is the small box that
floats near the wall on either the right side or the left side of the
force field as shown in Figure 8. When you shoot the source, the force
field is instantly vaporized. If the force field hits the deflector 
shields of your starfighter, it drains energy from your energy cells.

FIGURE 8

[SCREEN SHOT LOOKING DOWN TUNNEL. A "FORCE FIELD" IS VISIBLE IN THE CENTER
OF THE TUNNEL. (LOOKS LIKE A PARTIALLY TRANSPARENT DIVIDER PER FIG. 6.)
THE "SOURCE" IS VISIBLE NEAR THE CEILING ON THE RIGHT SIDE OF THE TUNNEL]


FIGURE 9

[SCREEN SHOT LOOKING DOWN TUNNEL. THE "ALIEN COMMAND SHIP" IS VISIBLE 
ABOVE AND TO THE RIGHT OF CENTER-SCREEN. (LOOKS LIKE A SIMPLE TYPE OF
SPACE STATION.)]


7. Shooting the Alien Command Ship: if you successfully navigate the entire
maze, you will confront the Alien Master in his Command Ship as shown in
Figure 9. You must shoot the command ship many times to destroy it. The
command ship has a powerful laser gun so watch out. If it shoots you, it
drains large amounts of energy from your energy cells.

8. If you complete an entire maze and destroy the alien command ship, you'll
be warped to the start of a new and tougher maze and your energy cells
will be fully recharged.

9. Scoring: your score is displayed at the bottom of the screen. Every 
target you destroy and each tunnel you successfully navigate adds to your 
score. The chart below shows points awarded for destroying targets on each
skill level.
_______________________________________________________
| | | | |
| Tunnel | Alien Guard | Force Field |Command Ship |
| Navigated | Destroyed | Destroyed | Destroyed |
__________|_____________|_____________|_____________|_____________|
| | | | | |
| Level 1 | 80 | 300 | 600 | 6000 |
|__________|_____________|_____________|_____________|_____________|
| | | | | |
| Level 2 | 80 | 400 | 700 | 7000 |
|__________|_____________|_____________|_____________|_____________|
| | | | | |
| Level 3 | 80 | 500 | 800 | 8000 |
|__________|_____________|_____________|_____________|_____________|
| | | | | |
| Level 4 | 80 | 600 | 900 | 9000 |
|__________|_____________|_____________|_____________|_____________|
| | | | | |
| Level 5 | 80 | 700 | 1000 | 10,000 |
|__________|_____________|_____________|_____________|_____________|

10.End of Game: The game is over if you crash in a dead end tunnel OR run
out of energy.

11.Depress the Game Reset Switch and press the Fire Button to start a new
game at any time.


Atari(R) is a registered trademark of ATARI, INC.
Tele-Games(R) is a registered trademark of Sears, Roebuck & Co.

2600(TM) is a trademark of ATARI, INC.
VIDEO ARCADE(TM) is a trademark of Sears, Roebuck & Co.
ColecoVision(TM) is the trademark of Coleco Industries, Inc.

_________________________________________________________________________
| |
| M A I N T E N A N C E A N D S E R V I C E I N F O R M A T I O N |
|_________________________________________________________________________|

IN CASE OF DIFFICULTY

In the event that you have difficulty with your Cosmic Commander Control or
Survival Run cartridge, disconnect them from your video game system console.
Replace them with another cartridge and joystick controller and operate your
system. If the difficulty continues to appear, consult your video computer
system owner's manual.

If the difficulty disappears, reconnect the Cosmic Commander Control and
Survival Run cartridge, following carefully the directions for setup on the
inside front cover of these instructions. If the difficulty persists, refer
to warranty information on page 12.


IMPORTANT CAUTIONS

* Always turn the Power Switch on the console OFF before inserting or
removing Survival Run or any other game cartridge.

* Don't try to force the cartridge into the console.

* Your Survival Run cartridge is protected from normal wear with a sturdy
plastic cover. However, care should be taken not to spill liquids on the
cartridge.

* Always check to see that the Cosmic Commander cable is firmly seated into
the LEFT joystick controller port of your video game system console.

If you have questions or need assistance, call Milton Bradley Company,
Customer Service Department, at the following toll-free number: dial:
1-800-628-8608 (not available in Hawaii or Alaska) and ask for Power Arcade
assistance. In Massachusetts call collect 1-413-525-6411. These lines operate 
from 8:00 a.m. to 4:30 p.m., Eastern time, Monday to Friday.
---------------------------------------------------------------------------

90 DAY LIMITED WARRANTY ON
COSMIC COMMANDER/SURVIVAL RUN

Cosmic Commander/Survival Run is warranted by Milton Bradley Company to
the original purchaser for a period of 90 days from the original purchase 
date under normal use and service against defective workmanship and materials
(batteries excluded).
This warranty is void if Cosmic Commander/Survival Run has been damaged by
accident or unreasonable use, neglect, misuse, abuse, improper service or
other causes not arising out of defects in workmanship or materials.
Milton Bradley shall not be liable for loss of use of Cosmic Commander/
Survival Run or other incidental or consequential costs, expenses or damages
incurred by the purchaser. Some states do not allow the exclusion or limit-
ation of incidental or consequential damages, so the above limitation or
exclusion may not apply to you.
During the warranty period, if found to be defective due to workmanship
or materials, Cosmic Commander/Survival Run will either be repaired or 
replaced with a reconditioned product of an equivalent quality (at Milton 
Bradley's option) without charge to the purchaser when returned with proof of
purchase date, shipping prepaid to the address listed below. In the event 
that Cosmic Commander/Survival Run is replaced, the warranty on the replac-
ement will be continued for 90 days.
This warranty gives you specific legal rights and you may also have other
rights which vary from state to state.


POST WARRANTY REPAIR POLICY -- COSMIC COMMANDER

After the 90 day warranty period has expired, Milton Bradley shall, for a
period of one year from the date of purchase, either repair your Cosmic Comm-
ander or replace it with a reconditioned product on the condition that you 
return your product, shipping prepaid, to the address listed below along with
proof of purchase date and your check or money order in the amount of $7.50.
Milton Bradley shall not be obligated to perform this service if Cosmic Comm-
ander has been abused, misused, improperly serviced or damaged due to 
accident.


MAILING INSTRUCTIONS

If the original packaging is available, repack Cosmic Commander/Survival
Run in its packing and box. If not available, wrap carefully, making sure to
surround the product with adequate padding. Please include a brief descrip-
tion of the problem, your return address and mail postage prepaid and insured
to the following address.

Milton Bradley Company
Attn: Electronic Warranty Repair
108 Industrial Drive
East Longmeadow, MA 01028


POST WARRANTY CARTRIDGE REPLACEMENT POLICY -- SURVIVAL RUN

Replacement cartridges may be purchased from Milton Bradley. Tell us the
name of the cartridge you wish to order and send a check or money order in
the amount of $20.00 for each cartridge to:

Customer Service
Milton Bradley Company
443 Shaker Road
East Longmeadow, MA 01028

4362-X1

REQUIRMENTS:
Our Atari 2600 emulator utilizes Javascript to run in your browser. No plugin is required, but a fast modern web browser will enhance the game play.

image 4
SAMPLE IPHONE GAMEPLAY SCREENSHOT

Emulation on mobile devices will drain your battery quite fast. I recommend playing while device is plugged into charger.
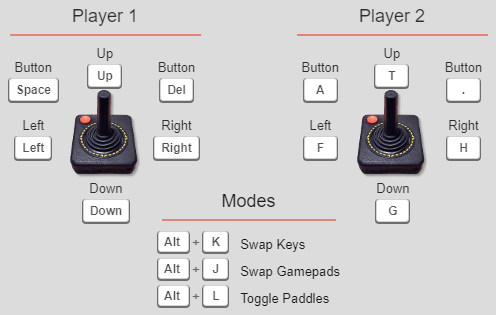
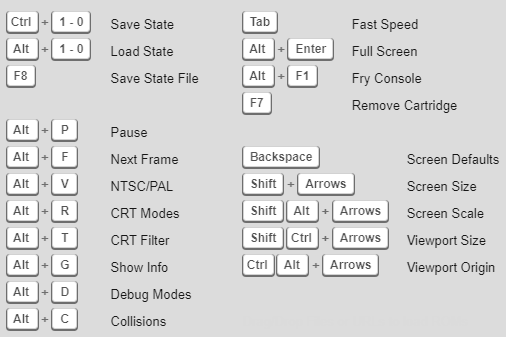

KEYBOARD CONTROLS

controls
help

SurvivalRun Arcade Game Emulated on the Atari 2600. Play SurvivalRun in your web browser or mobile phone. This Atari 2600 console emulator provides very accurate SurvivalRun gameplay. SurvivalRun is a classic 1980s Atari 2600 video game.